When adding a RHEL machine as a managed server in Veeam Backup & Replication, the installation reached Configuring Veeam Data Mover service and failed with this error:
Configuring Veeam Data Mover Service Error: Remote failed with message: No such file or directory Timed out connecting to peer –tr:Failed to connect to local server: [/run/veeamenvironment/socket] Failed to update option FirewallPortRange, with value 2500:3300.
Possible cause
Firewalld was installed but not running. Its saved configuration already contained the veeamdefault and veeamdeploysvc policies, suggesting Veeam had begun configuring firewall access during deployment.
The suspected issue was that firewall initialisation was delaying the Veeam Environment Service, causing Data Mover configuration to time out while connecting to its local socket. This was not necessarily a case of the firewall blocking network traffic.
If you have existing VDC (Veeam Data Cloud) Vault repositories that were originally added using the earlier shared key authentication method, Veeam Backup & Replication may prompt you to perform a component upgrade. The message may be similar to:
Component update: Update Required — Switch to Microsoft Entra ID authentication
This upgrade changes the Vault repository authentication method from shared keys to Microsoft Entra ID authentication, improving security and aligning the repository with the newer Veeam Data Cloud Vault integration model.
This is particularly relevant because Veeam Backup & Replication 12.3.1 introduced automatic upgrade of Veeam Vault V1 repositories using shared key authentication to V2 repositories using Entra ID authentication. In VBR v13, Veeam Data Cloud Vault integration only supports using the newer Entra ID auth rather than the earlier shared key method.
In some environments, attempting the upgrade may fail with an error similar to:
Failed to assign Veeam Data Cloud Vault with the storage account
A common cause is that the Veeam Backup & Replication server has not yet been authorised with Veeam Data Cloud Vault, or the required storage vault has not been assigned to the VBR workload.
If you’re managing backups stored in the cloud, you’ve probably wrestled with infrastructure headaches, cost control, and security. Enter Veeam Data Cloud Vault (VDC Vault)—Veeam’s fully-managed, secure cloud storage solution built on Azure Blob Storage. VDC Vault isn’t just another bucket in the cloud; it’s a hands-off, immutable, designed to keep your data out of harm’s way and out of your own infrastructure.
So why choose VDC Vault? You get Azure’s scale and security, but with Veeam’s management, automation, and immutability baked in. It’s separated from your own environment, making it ideal for ransomware recovery, long-term retention, and compliance. You don’t need to DIY your own BLOB storage or worry about setting it up correctly—Veeam handles all that for you. It’s a simple subscription service: add Vault as a repository in Veeam Backup & Replication (VBR), set up your jobs, and you’re off.
Many organisations are moving to VDC Vault but, as with all migrations, there are caveats and best practices. Here’s what we’ve learned.
Verifying backups is a hot topic—everyone wants to be certain their data is safe, but few think beyond “does my backup match production?”. The reality is, backup verification isn’t as straightforward as ticking a box. Let’s explore the differences between what’s commonly asked for and what’s genuinely needed to ensure true recoverability.
The Basics: Matching Backups to Source
Most start with the basics: “Does my backup match the live VM?” Veeam handles this with storage-level corruption guards, performing CRC checks to confirm the backup files aren’t silently corrupted. It’s a good start, but it’s not the whole story.
The catch? If there’s a problem hidden in production—a missing system file, a corrupt OS, an application that’s quietly broken—your backup will faithfully preserve that issue. Garbage in equals garbage out. The backup matches production perfectly, but if production is flawed, your backup will be too. That problem won’t reveal itself until you next reboot or, worse, when you need to restore.
I recently deployed a Veeam Hardened Repository (VHR) ISO which involved removing the old Ubuntu based VHR server. Unfortunately I was a little too eager and deleted the VM before I had removed it from Veeam Backup and Replication (VBR). When I attempted to remove the old VHR the following error was displayed.
Infra item delete failed Error: A connection attempt failed because the connected party did not properly respond after a period of time, or established connection failed because connected host has failed to respond
Attempting to remove the server via PowerShell resulted in the same error.
For those diving into NAS sizing, I wanted to share this write up to help explain the roles of the Cache Repositories and Metadata. The sizing of these components varies depending on the type of backup storage you’re using. This consideration has become increasingly important with the addition of object storage support in v12.
A Cache Repository is a storage location where Veeam Backup & Replication keeps temporary cached metadata (folder level hashes) for the NAS data being protected. A Cache Repository improves incremental backup performance because it enables Veeam to quickly identify source folders that don’t have any changes via matching hashes stored in the Cache Repository.
When NAS backup is targeting a disk-based repository, the cache metadata is held in memory so very little if any storage on the Cache Repository is required, roughly 1 to 2 GB for disk-based repositories.
Not to be confused with cached metadata (folder level hashes) on the Cache Repository, Metadata is created by Veeam used to describe the backup files, source, files name version and pointers to backup blobs. Most often, when performing restore, merge, transform operations, Veeam interacts with this Metadata rather than with the backup data.
Metadata is always redundant (“meta” and “metabackup” or “metacopyv2”). The actual placement and number of metadata copies is dependent on the repository configuration and type. This is important to understand because the number and placement of Metadata will impact how much storage is required.
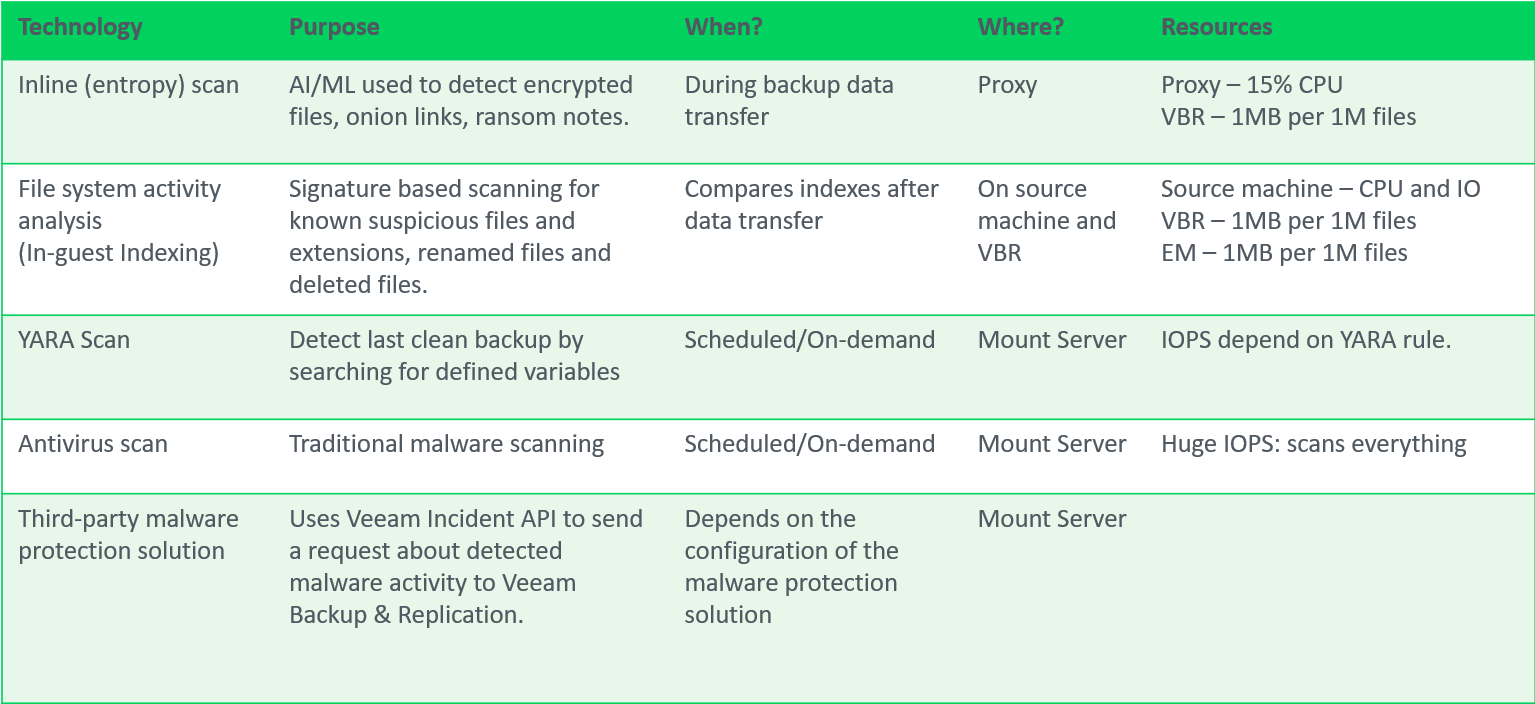
In this blog, I’ll be exploring the new security features that are included in the latest version of Veeam Backup & Replication v12.1, this includes Inline Entropy Analysis, File Index Analysis, and YARA Scanning.
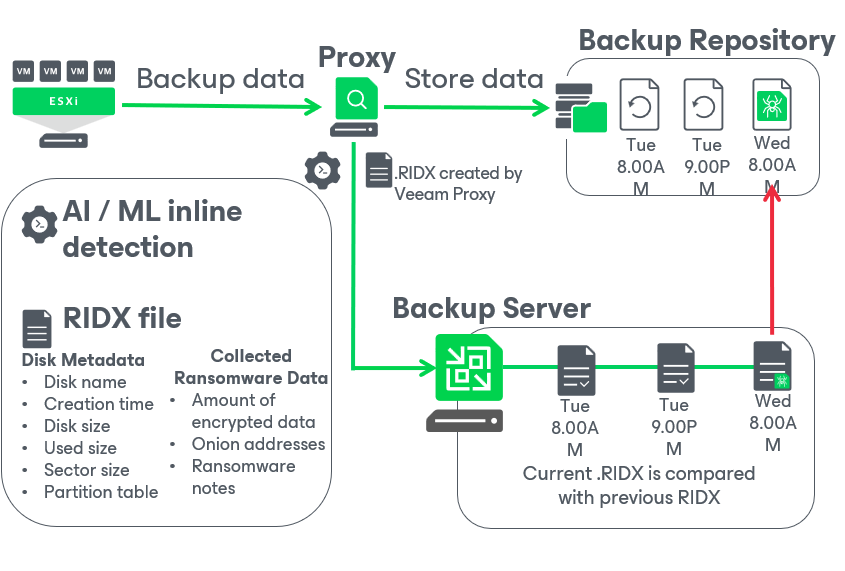
Inline Entropy Analysis Analyses each source disk block on the fly using an AI/ML-trained model. The scan occurs during every backup run, providing real-time insights into potential anomalies or threats at the block level. Veeam looks for ransomware notes, onion links and data that has recently become encrypted without needing additional software.
Inline analysis is disabled by default, given it’s potential resource consumption so when planning to enable this feature be sure to check if your backup proxies have spare CPU resources, plan for 10-15% additional CPU load per proxy. After enabling, during the first backup run, a full disk scan is performed to create a baseline (not a full backup). It’s possible to exclude machines to reduce the impact during this intial scan using Malware Exclusions.
The sensitivity for inline entropy analysis can be adjusted, it’s recommended to use low sensitivity for environments with heavy encryption usage.
Let’s dive deeper and have a look at a how Veeam inline entropy scanning works once it’s enabled,
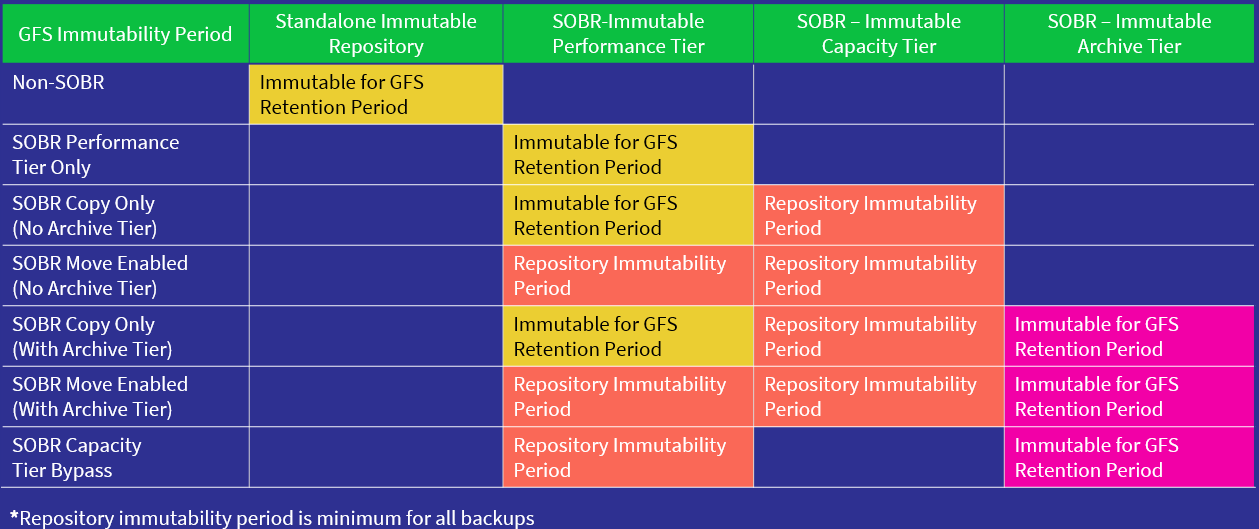
Determining immutability periods when working with Grandfather, Father, Son (GFS) backups can be a bit tricky considering GFS immutability periods can be determined by either
a) the GFS retention period
b) the Backup Repositories immutability period.
Fortunately, Fabian (@Mildur) from the Veeam R&D forums shared valuable insights that simplify this process. The full discussion can be found here.
The key takeaways from the forum discussion are as follows:
Standalone Repositories: In the case of standalone repositories, data remains immutable throughout the GFS retention period. This means the backup data is secure and unchangeable throughout the entire GFS retention timeline.
Performance Tier without Capacity Tier: When using the Performance Tier without the Capacity Tier, data immutability holds for the complete GFS retention period.
Performance Tier with Move Policy Disabled: Similar to the previous scenario, if the ‘Move Policy’ is disabled within the capacity tier, the data will be immutable for the entire GFS retention period.
Performance Tier with Move Policy Enabled: When the Move Policy is enabled within the Capacity Tier, unlike the previous example, immutability is applied as per the repository’s immutable retention period.
On Capacity Tier: For backup data stored on capacity tier, the immutability aligns with the repository’s settings.
On Archive Tier: Within the Archive Tier, data immutability is for the entire GFS retention period.
An essential note from the forum post highlights that if the GFS retention period is shorter than the Repository immutability period, the Repository immutability period becomes the minimum for all backup files. In other words, whichever is longer out of the two will be the immutability period.
To simplify this further, check out this fabulous table created by a fellow Veeam colleague, John Suh.
The business categorisation feature available in Veeam ONE offers a solution for managing and organising virtual machines (VMs) within virtualised infrastructures, such as stretched cluster environments. By leveraging the underlying ESXi host information, this feature allows IT administrators to create a seamless and dynamic approach to VM management, ensuring optimal backup and recovery strategies.
In a stretched cluster scenario, where VMs can move between different data centres for improved availability and disaster recovery capabilities, the ability to group VMs based on their current location can be quite important. For example, if there is a need to ensure transient VMs are protected to a local backup repository.
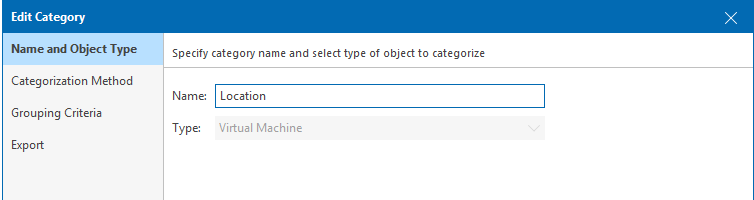
Leveraging Veeam ONE’s business categorisation means we can tag VMs according to the specific ESXi host they are running on. Tags can then be configured as the source for a Veeam backup job.
Step 1. Create the category,
Step 2. Pick ‘Grouping expression’ as the Categorisation method.
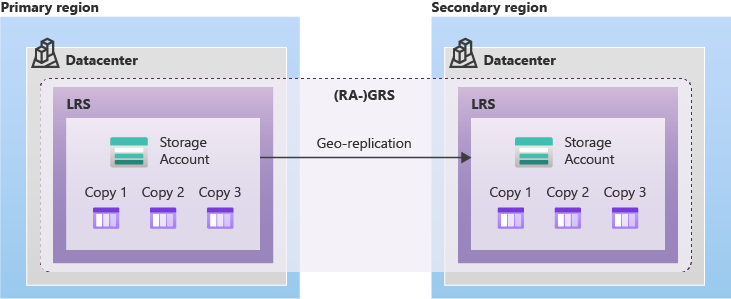
Whenever using Veeam Backup for Azure, there are two popular options for creating multiple copies of the backup data. First is a backup copy job from an external repository. The second option is to rely on the native storage redundancy provided by Azure, such as geo-redundant storage (GRS) or read-access geo-redundant storage (RA-GRS). The purpose of this article is to explore this second option by leveraging RA-GRS to achieve backup redundancy across two Azure regions.
As a quick reminder, with RA-GRS and GRS, the data is stored in two separate locations, with one being the primary location and the other being a secondary location. The secondary location is located in a different geographic region than the primary location, ensuring that data is safe even in the event of a regional outage or natural disaster.
Azure Storage Redundancy
It’s worth mentioning that while GRS helps ensure that backup data is safe even in the event of a regional outage or natural disaster there are some potential disadvantages with it. For starters, I don’t consider backups stored in GRS as a true ‘independent’ second copy of your backup because GRS replicates blobs with corrupted data inside them. This means any corrupted backups would also be replicated in the second region.
Secondly, we must consider that GRS uses asynchronous replication to the target region. An unplanned failover could result in blobs not being replicated at the target which would likely lead to restore or backup failures. While the possibility of this happening is quite slim, it can’t be ruled out.
For more detail on the different types of Azure storage check out my previous writeup here
For testing, An RA-GRS storage account was provisioned in Australia East from which Azure automatically configured the secondary region to Australia Southeast. This paired secondary region is determined based on the primary region and can’t be changed. Access to the storage account is via public endpoints.