In this blog, I’ll be exploring the new security features that are included in the latest version of Veeam Backup & Replication v12.1, this includes Inline Entropy Analysis, File Index Analysis, and YARA Scanning.
Inline Entropy Analysis
Analyses each source disk block on the fly using an AI/ML-trained model. The scan occurs during every backup run, providing real-time insights into potential anomalies or threats at the block level. Veeam looks for ransomware notes, onion links and data that has recently become encrypted without needing additional software.
Inline analysis is disabled by default, given it’s potential resource consumption so when planning to enable this feature be sure to check if your backup proxies have spare CPU resources, plan for 10-15% additional CPU load per proxy. After enabling, during the first backup run, a full disk scan is performed to create a baseline (not a full backup). It’s possible to exclude machines to reduce the impact during this intial scan using Malware Exclusions.
The sensitivity for inline entropy analysis can be adjusted, it’s recommended to use low sensitivity for environments with heavy encryption usage.
Let’s dive deeper and have a look at a how Veeam inline entropy scanning works once it’s enabled,
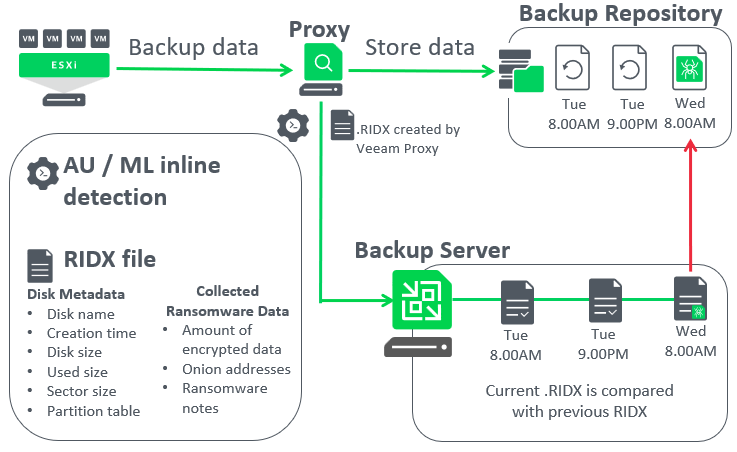
- Veeam proxies analyse the source disks being protected during the backup run
- The results of the analysis is stored inside an RIDX file on the backup proxy. Details such as disk name, disk size, used size and importantly information about encrypted data or any detected presence of onion addresses, and ransomware notes. This is where the extra 10-15% of CPU processing is required.
- Next, the RIDX file is transferred from the proxy to the backup server where the Veeam Data Analyzer service compares the latest RIDX and previous RIDX files.
- If malware activity is detected, Veeam will create a malware detection event and mark the objects as suspicious.
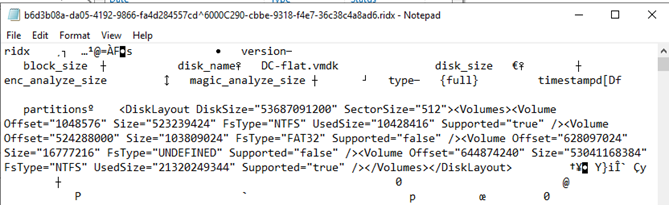
The below screenshot is taken from an opened RIDX file using notepad. As a Veeam administrator you’re not expected to ever open the RIDX file but I thought it was interesting to share what they look like inside.
Worht mentioning is that inline entropy analysis does not work at the file system level, instead it tracks suspicious patterns at a block level. As such, this detection method doesn’t know which specific file is encrypted or is a ransomware note. Only that if the amount of encrypted data exceeds scan sensitivity limits or a detection of ransomware notes or onion links then a malware detection event will be created.
However, that’s were the next Veeam scanning tool comes into play to help you identify malware at the file system layer.
File Index Analysis Tool (suspicous file system activity)
Veeam’s File Index Analysis tool offers an advanced layer of security by scanning the indexes of the guest OS file system. Unlike inline entropy scans, which operate at the block level, this tool targets the file system level to detect potential threats.
This tool searches for files with known malware file extensions, bulk deletes and bulk renames of known “good” files (such as documents and images). Additionally, it’s looking for the creation of many new files with previously unknown extensions appearing, such as files being replaced by their encrypted counterpart during a ransomware attack.
If enabled, the malware definition list is automatically updated, this basically involves an xml file being replaced as new updates are available. If the backup server has limited internet access, you can update the list of suspicious files and extensions manually. This involves download the new xml file and replacing the existing one on the Veeam Backup & Replications server.
Something to know, the xml file itself contains a signature, so if attackers tried to modify this, Veeam would refuse to load the file, so do not edit the SuspiciousFiles.xml directly. If you want to customize the list of suspicious files and extensions, you can do it in the malware detection settings within the VBR console/gui
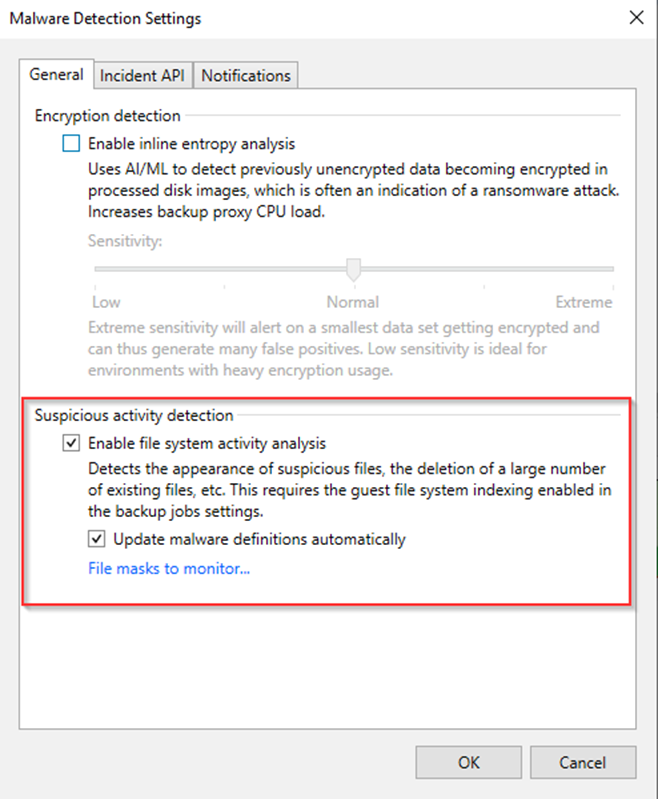
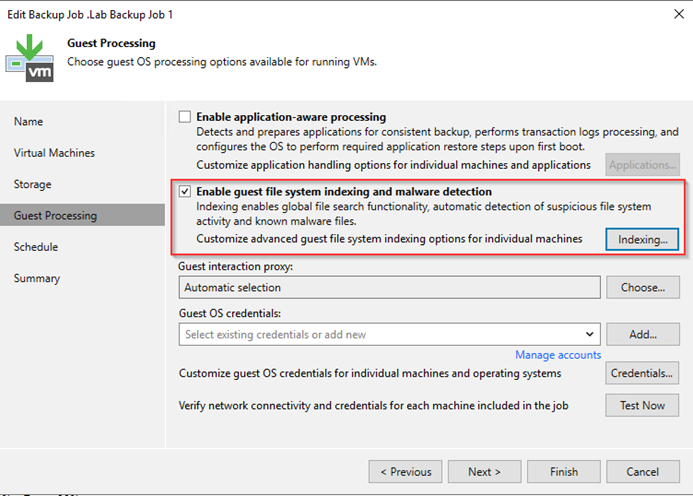
This functionality works independently from the inline malware detection, and is enabled by default, however it does require guest file system indexing enabled in each backup job. It’s quite simple to enable and select which VMs should be indexed or not.
YARA Scan
YARA rules use signature-based detection which provide yes or no results. They can identify various patterns, such as credit card numbers or malware signatures, enabling administrators to find clean restore points quickly and prevent malware reintroduction into the production environment.
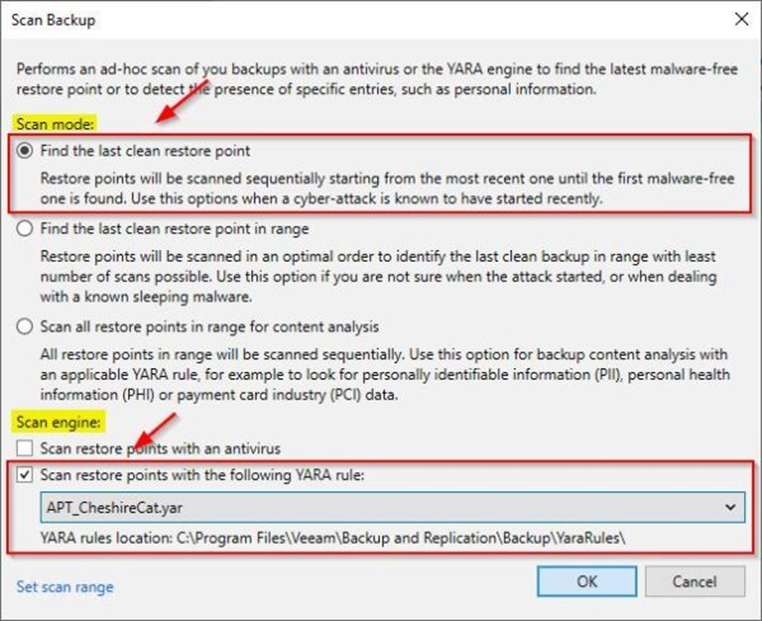
So with the previous malware detection engines mentioned earlier in this blog, they all happen as the backup job runs, however YARA scanning happens after the backup has been created. YARA scanning can be scheduled within a SureBackup job, during a restore (Secure Restore) or run ad-hoc / on-demand.
For those unfamiliar with YARA, it stands for Yet Another Recursive Acronym. Initially designed for malware researchers to identify and classify malware samples, YARA has evolved into a robust tool for pattern matching useful for data classification and more..
So in situations where you know the malware strain you’re dealing with, you can very quickly hunt for that specific signature across of malware across VMs, YARA scanning is significantly faster compared to your typical anti-virus scan.
There are a couple ways we can leverage YARA scannign with Veeam,
With on-demand scanning, Veeam can sequentially search restore points starting with the most recent until a clean restore point is found. Veeam can also search all restore points in a certain range to look for personal identifiable data, health information, payment information.
It’s possible to schedule content scans periodically with SureBackup (Secure Restore) or perform scans ad-hoc using the restore point selection algorithm most suitable for the situation.
I’ve left anti-virus scanning out of this blog since it was introduced in an earlier version of Veeam and has been covered several times in other blogs. For more information of anything discussed I recommend reading the official Veeam user guide.